![厨房内有不锈钢洗碗机和白色橱柜](https://kitchenaid-h.assetsadobe.com/is/image/content/dam/business-unit/whirlpoolv2/en-us/marketing-content/site-assets/page-content/oc-articles/how-to-install-a-dishwasher/how_to_install_a_dishwasher_masthead_v3.jpg?fit=constrain&fmt=jpg&wid=2875)
如何安装洗碗机
安装洗碗机似乎是一项具有挑战性的任务,但只要有适当的管道和电气要求,并仔细查看产品的安装说明,就可以完成。无论您是更换旧洗碗机还是安装厨房的第一台洗碗机,您都可以使用本指南作为安装过程的一般大纲。具体的安装说明因型号而异,所以在整个安装过程中一定要参考洗碗机的使用和保养指南。如果你还在买新的洗碗机,探索惠而浦品牌的创新选择。
如何安装洗碗机:一步一步的说明
安装洗碗机是一项任务,包括拆除你的旧电器(如果适用),连接水管,连接电线,调平你的机器和运行测试,以确保电器正常工作。如果你是第一次安装洗碗机,这个过程可能需要至少两个小时。如果在开始安装之前,你必须移除一台旧洗碗机,这个过程会花费更长的时间。确保至少有另一个人的协助,因为在安装过程中您将需要抬起和倾斜设备。由于不同型号的设备安装步骤可能不同,请根据下面的逐步说明以及设备的产品手册说明来感受这个过程。
安装洗碗机需要的东西:
供应
浅锅或浅桶
毛巾或大块硬纸板
手电筒
水管安装套件
电源线
工具
你的洗碗机包括零件
无绳钻
可调扳手
套筒扳手
螺丝刀
水平
钳
卷尺
工具刀
安装说明中列出的其他工具或供应品
![安装洗碗机时,站在清洁工作区旁边的人](https://kitchenaid-h.assetsadobe.com/is/image/content/dam/business-unit/whirlpoolv2/en-us/marketing-content/site-assets/page-content/oc-articles/how-to-install-a-dishwasher/how_to_install_a_dishwasher_IMG11.jpg?fmt=png-alpha&qlt=85,0&resMode=sharp2&op_usm=1.75,0.3,2,0&scl=1&constrain=fit,1)
![](https://kitchenaid-h.assetsadobe.com/is/image/content/dam/business-unit/whirlpoolv2/en-us/marketing-content/site-assets/page-content/oc-articles/how-to-install-a-dishwasher/how_to_install_a_dishwasher_IMG11.jpg?fmt=png-alpha&qlt=85,0&resMode=sharp2&op_usm=1.75,0.3,2,0&scl=1&constrain=fit,1)
第二步:移除当前的洗碗机(如果适用)
在卸载当前洗碗机之前,请断开断路器上的洗碗机电源,并切断设备的水供应。一旦成功切断水电,将洗碗机的插座拔掉,并断开供水管道和排水软管。用毛巾、浅平底锅或水桶接住可能从排水软管中漏出的多余水。
接下来,拆下固定洗碗机在橱柜和工作台上的螺丝。使用螺丝刀拆卸洗碗机门下方的前检修板,并调整每个角落的调平腿,使洗碗机更容易拆卸。为了保护你的地板不受磨损和划伤,在你开始从橱柜的开口拉出洗碗机之前,在洗碗机前面放一条浴巾或一大块纸板。在安装新洗碗机之前,把旧机器滑到毛巾或纸板上,把它移开。
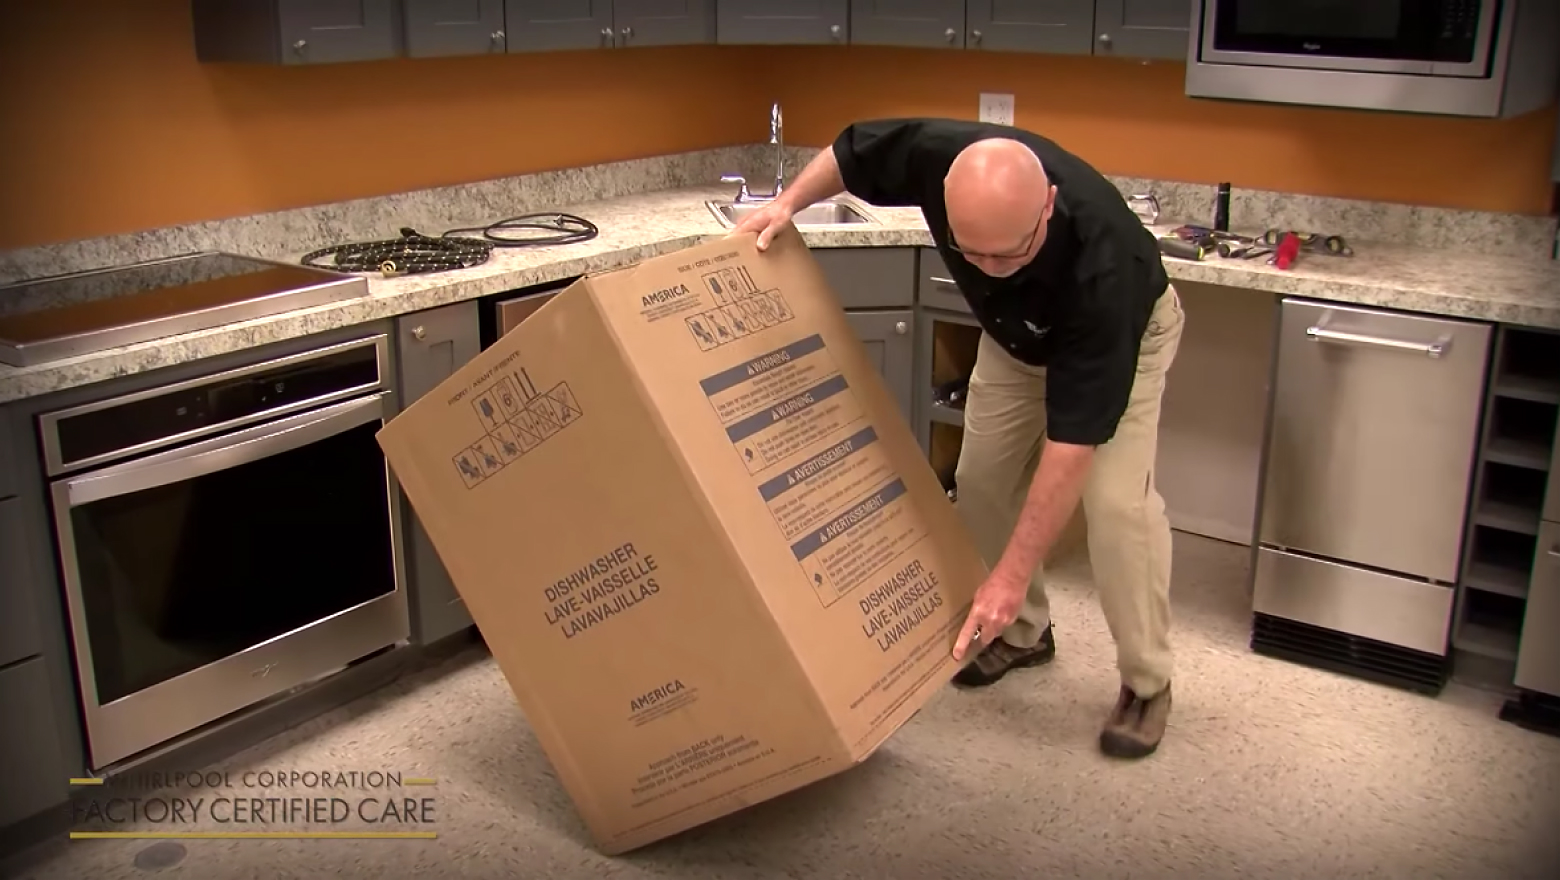
![移动包装洗碗机的人](https://kitchenaid-h.assetsadobe.com/is/image/content/dam/business-unit/whirlpoolv2/en-us/marketing-content/site-assets/page-content/oc-articles/how-to-install-a-dishwasher/how_to_install_a_dishwasher_IMG3-1.jpg?fmt=png-alpha&qlt=85,0&resMode=sharp2&op_usm=1.75,0.3,2,0&scl=1&constrain=fit,1)
![](https://kitchenaid-h.assetsadobe.com/is/image/content/dam/business-unit/whirlpoolv2/en-us/marketing-content/site-assets/page-content/oc-articles/how-to-install-a-dishwasher/how_to_install_a_dishwasher_IMG3-1.jpg?fmt=png-alpha&qlt=85,0&resMode=sharp2&op_usm=1.75,0.3,2,0&scl=1&constrain=fit,1)
第三步:准备新洗碗机安装
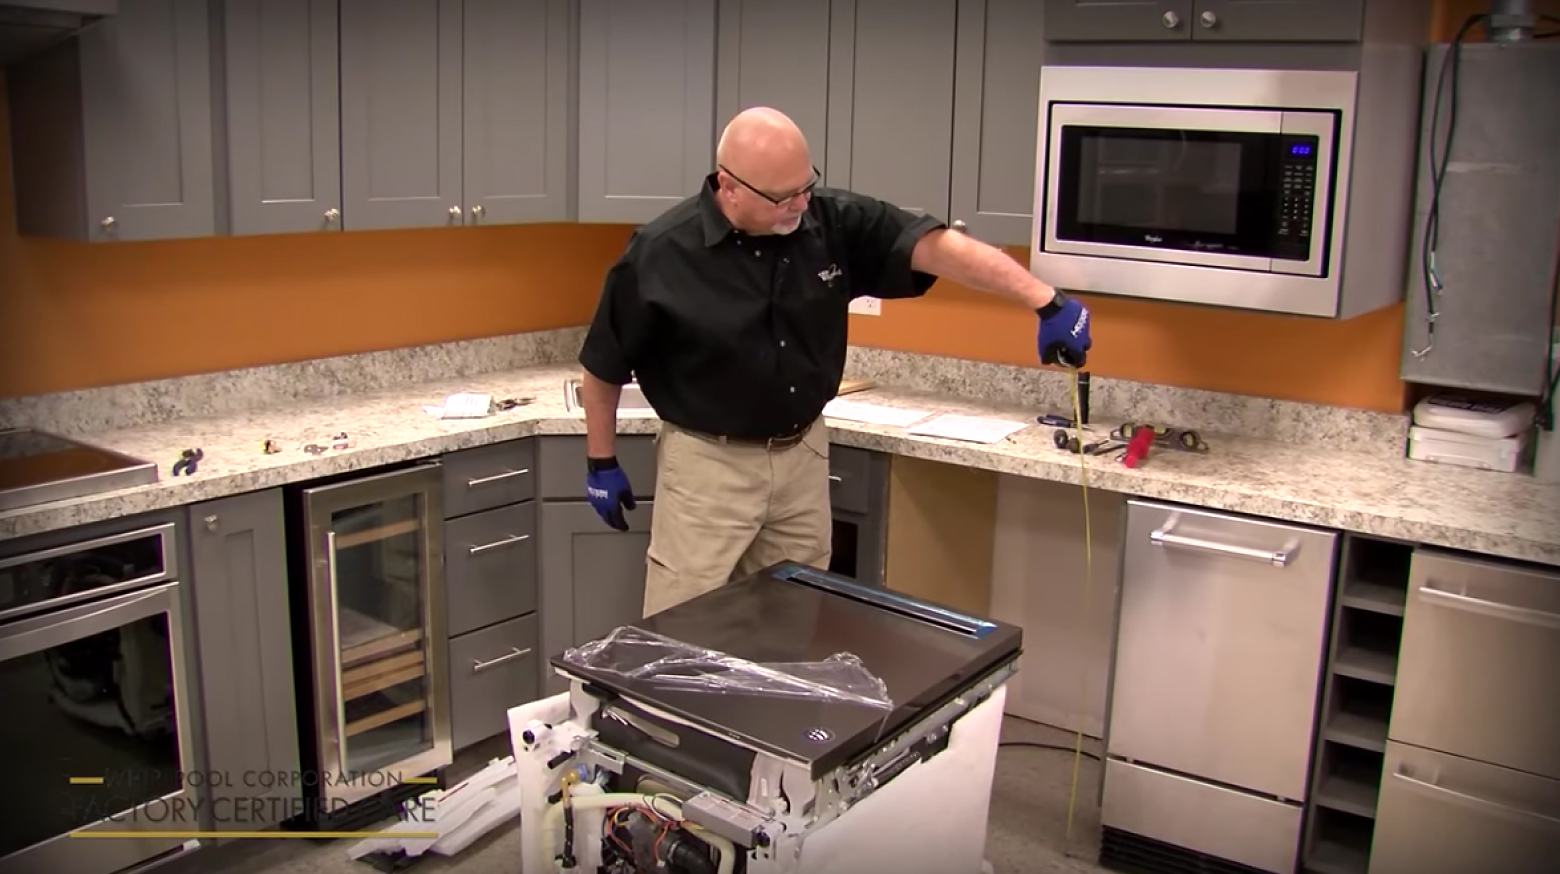
打开装电器的纸箱,取出运输材料。为安装过程预留一大块纸板。打开洗碗机门,取出内部的泡沫塑料或保鲜膜。把盒子里单独包装的零件或工具放在一边。
在至少另一个人的帮助下,将洗碗机向后倾斜。拆卸前检修面板。如果你的模型有滴水盘,断开托盘传感器。将电源线穿过接线盒,并按照产品说明书的说明连接其余电线。将排水软管连接到排水口,然后将排水软管和电源线连接到洗碗机的后腿下面。
提示:
节省你的新洗碗机包装上的木凹槽。如果你需要把电器安装在一个稍宽的柜子里,可以用木垫片来合适地安装。
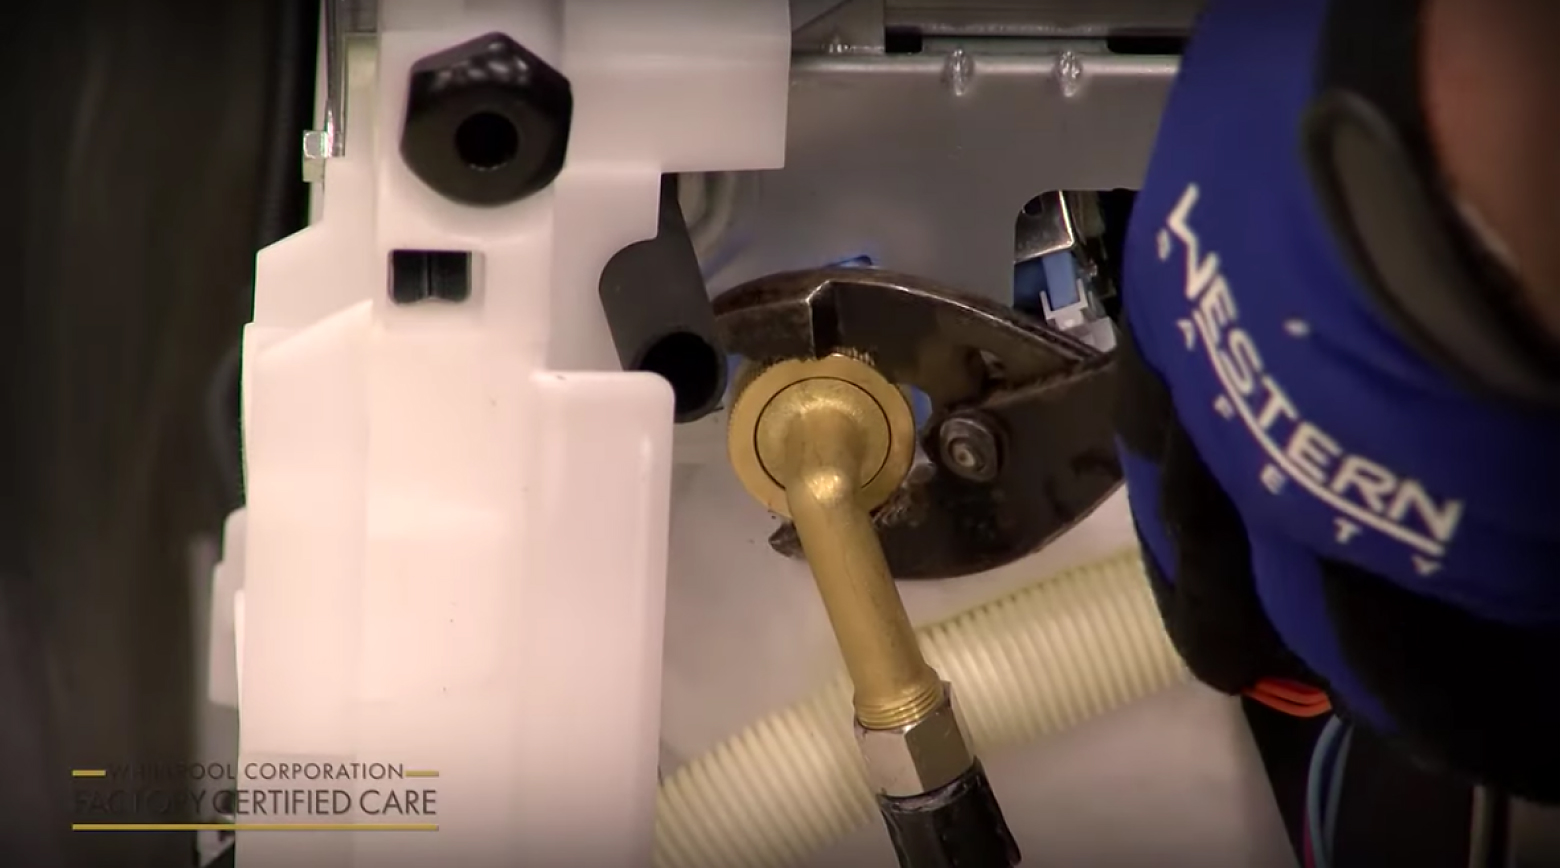
![连接供水软管的扳手](https://kitchenaid-h.assetsadobe.com/is/image/content/dam/business-unit/whirlpoolv2/en-us/marketing-content/site-assets/page-content/oc-articles/how-to-install-a-dishwasher/how_to_install_a_dishwasher_IMG1-1.jpg?fmt=png-alpha&qlt=85,0&resMode=sharp2&op_usm=1.75,0.3,2,0&scl=1&constrain=fit,1)
![](https://kitchenaid-h.assetsadobe.com/is/image/content/dam/business-unit/whirlpoolv2/en-us/marketing-content/site-assets/page-content/oc-articles/how-to-install-a-dishwasher/how_to_install_a_dishwasher_IMG1-1.jpg?fmt=png-alpha&qlt=85,0&resMode=sharp2&op_usm=1.75,0.3,2,0&scl=1&constrain=fit,1)
第四步:安装洗碗机的供水系统
将90度弯头接头连接到供水管道上,将填充软管连接到洗碗机底部的阀门上,用手拧紧,然后用钳子再拧紧1 / 4到1 / 2圈。不要在水阀螺纹上使用聚四氟乙烯胶带或螺纹密封剂。确保橡胶垫圈在水管接头内。将给水管道引向洗碗机的后部。
![手持式卷尺](https://kitchenaid-h.assetsadobe.com/is/image/content/dam/business-unit/whirlpoolv2/en-us/marketing-content/site-assets/page-content/oc-articles/how-to-install-a-dishwasher/how_to_install_a_dishwasher_IMG1-5.jpg?fmt=png-alpha&qlt=85,0&resMode=sharp2&op_usm=1.75,0.3,2,0&scl=1&constrain=fit,1)
![](https://kitchenaid-h.assetsadobe.com/is/image/content/dam/business-unit/whirlpoolv2/en-us/marketing-content/site-assets/page-content/oc-articles/how-to-install-a-dishwasher/how_to_install_a_dishwasher_IMG1-5.jpg?fmt=png-alpha&qlt=85,0&resMode=sharp2&op_usm=1.75,0.3,2,0&scl=1&constrain=fit,1)
第五步:调平并调整器具高度
测量你的橱柜开口高度,调整你的洗碗机后部调平腿以匹配。使用水平尺来确保调平腿是均匀的,因为洗碗机需要水平放置以保证排水。
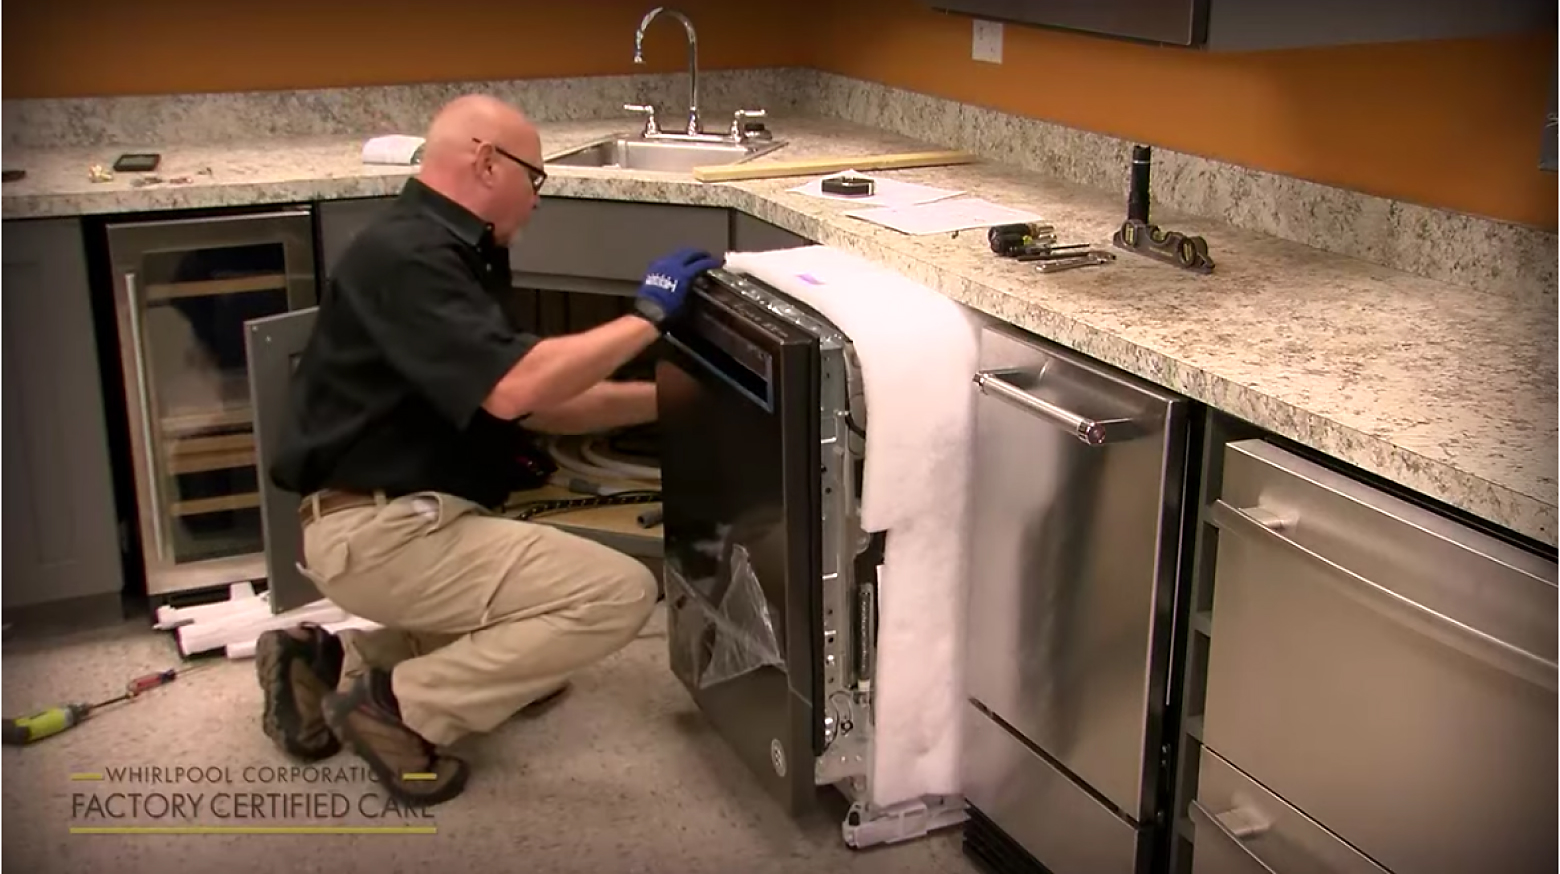
![安装新洗碗机的人](https://kitchenaid-h.assetsadobe.com/is/image/content/dam/business-unit/whirlpoolv2/en-us/marketing-content/site-assets/page-content/oc-articles/how-to-install-a-dishwasher/how_to_install_a_dishwasher_IMG6-1.jpg?fmt=png-alpha&qlt=85,0&resMode=sharp2&op_usm=1.75,0.3,2,0&scl=1&constrain=fit,1)
![](https://kitchenaid-h.assetsadobe.com/is/image/content/dam/business-unit/whirlpoolv2/en-us/marketing-content/site-assets/page-content/oc-articles/how-to-install-a-dishwasher/how_to_install_a_dishwasher_IMG6-1.jpg?fmt=png-alpha&qlt=85,0&resMode=sharp2&op_usm=1.75,0.3,2,0&scl=1&constrain=fit,1)
第六步:把洗碗机搬到合适的位置
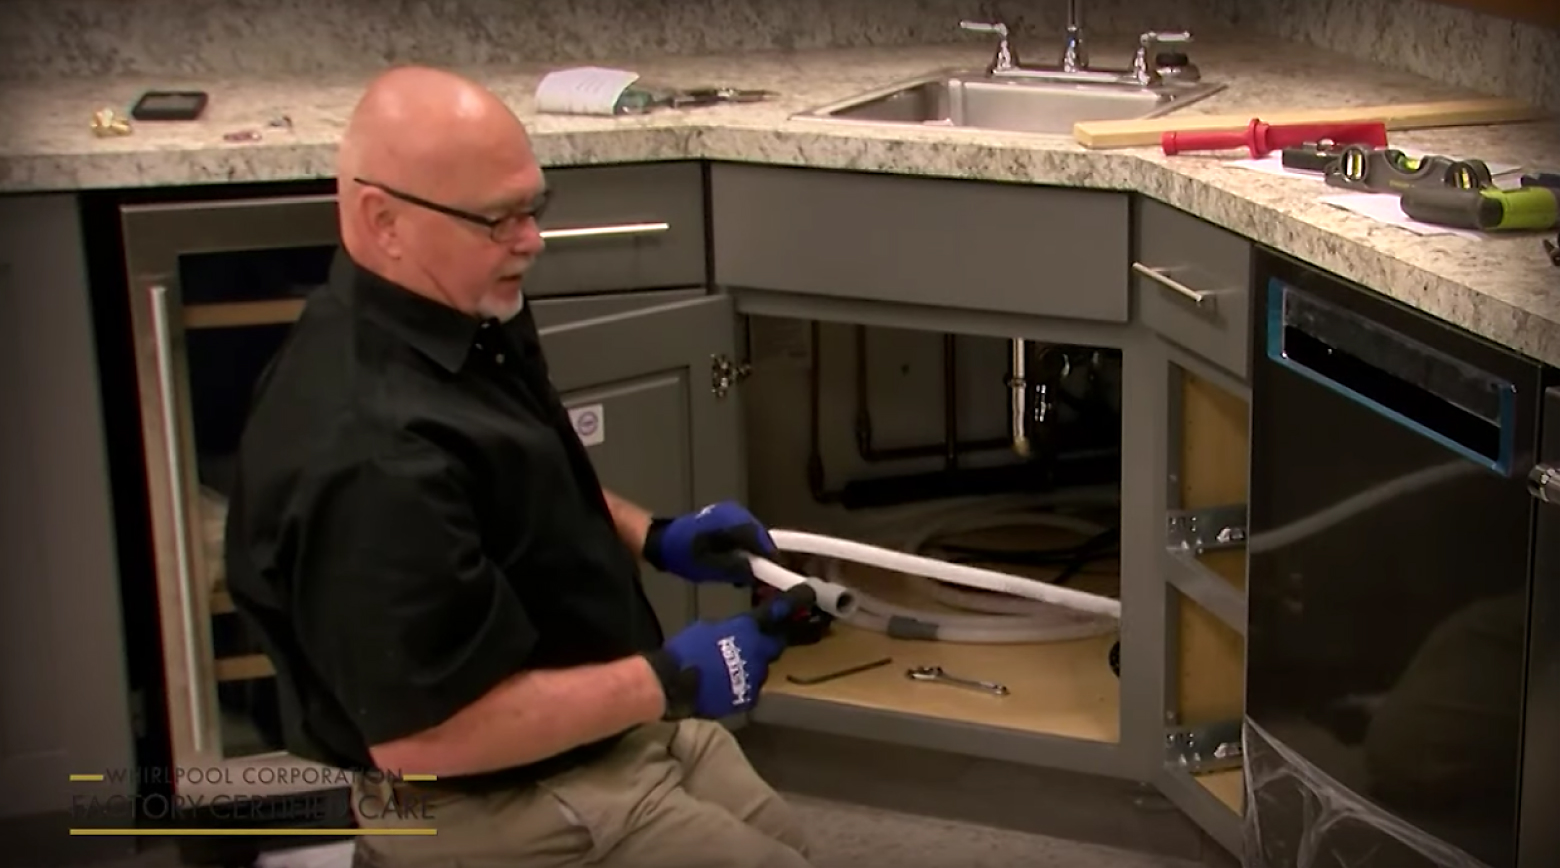
在至少另一个人的帮助下,将洗碗机垂直地倾斜在一块大纸板上,并将其移向所需的位置。将电源线、排水软管和供水管线穿过水槽柜。通过将排水软管紧固在水槽下面的机柜背面,避免从水槽的排水管中反冲洗。确保软管拱起比排水管入口高。把洗碗机滑进柜口。
![用手触摸打开的洗碗机上方的工作台面](https://kitchenaid-h.assetsadobe.com/is/image/content/dam/business-unit/whirlpoolv2/en-us/marketing-content/site-assets/page-content/oc-articles/how-to-install-a-dishwasher/how_to_install_a_dishwasher_IMG7-1.jpg?fmt=png-alpha&qlt=85,0&resMode=sharp2&op_usm=1.75,0.3,2,0&scl=1&constrain=fit,1)
![](https://kitchenaid-h.assetsadobe.com/is/image/content/dam/business-unit/whirlpoolv2/en-us/marketing-content/site-assets/page-content/oc-articles/how-to-install-a-dishwasher/how_to_install_a_dishwasher_IMG7-1.jpg?fmt=png-alpha&qlt=85,0&resMode=sharp2&op_usm=1.75,0.3,2,0&scl=1&constrain=fit,1)
第七步:将洗碗机固定在橱柜和台面上
将锚架固定在洗碗机左边和一侧的接箍顶部,然后将洗碗机向后滑动,直到外部与周围的橱柜门齐平。用水平尺检查洗碗机顶部边缘的水平度,并根据需要调整前水平腿,以确保腿牢固地贴在地板上。放平后,拧上固定支架,将洗碗机固定到位。
![有人在把水管连接到洗碗机上](https://kitchenaid-h.assetsadobe.com/is/image/content/dam/business-unit/whirlpoolv2/en-us/marketing-content/site-assets/page-content/oc-articles/how-to-install-a-dishwasher/how_to_install_a_dishwasher_IMG1-3.jpg?fmt=png-alpha&qlt=85,0&resMode=sharp2&op_usm=1.75,0.3,2,0&scl=1&constrain=fit,1)
![](https://kitchenaid-h.assetsadobe.com/is/image/content/dam/business-unit/whirlpoolv2/en-us/marketing-content/site-assets/page-content/oc-articles/how-to-install-a-dishwasher/how_to_install_a_dishwasher_IMG1-3.jpg?fmt=png-alpha&qlt=85,0&resMode=sharp2&op_usm=1.75,0.3,2,0&scl=1&constrain=fit,1)
第八步:连接软管和洗碗机电源
按照产品说明书的说明,将供水管道连接到热水管道上,并在关闭阀处打开水。将排水软管连接到排水口,然后插上电源线。如果洗碗机有滴水盘,重新连接。
![不锈钢顶部控制洗碗机门半开](https://kitchenaid-h.assetsadobe.com/is/image/content/dam/business-unit/whirlpoolv2/en-us/marketing-content/site-assets/page-content/oc-articles/how-to-install-a-dishwasher/how_to_install_a_dishwasher_IMG9-2.jpg?fmt=png-alpha&qlt=85,0&resMode=sharp2&op_usm=1.75,0.3,2,0&scl=1&constrain=fit,1)
![](https://kitchenaid-h.assetsadobe.com/is/image/content/dam/business-unit/whirlpoolv2/en-us/marketing-content/site-assets/page-content/oc-articles/how-to-install-a-dishwasher/how_to_install_a_dishwasher_IMG9-2.jpg?fmt=png-alpha&qlt=85,0&resMode=sharp2&op_usm=1.75,0.3,2,0&scl=1&constrain=fit,1)
第九步:运行洗碗机测试循环
为了检查泄漏或其他性能问题,对你的新洗碗机进行一个测试周期。测试周期说明因型号而异,因此请务必参阅产品手册中提供的测试说明。一旦你的洗碗机通过了测试周期,安装前面板,确保上面有印刷的一面正对着洗碗机,然后从外部剥下保护塑料内衬。
![把手伸进装了东西的洗碗机](https://kitchenaid-h.assetsadobe.com/is/image/content/dam/business-unit/whirlpoolv2/en-us/marketing-content/site-assets/page-content/oc-articles/how-to-install-a-dishwasher/how_to_install_a_dishwasher_IMG10.jpg?fmt=png-alpha&qlt=85,0&resMode=sharp2&op_usm=1.75,0.3,2,0&scl=1&constrain=fit,1)
![](https://kitchenaid-h.assetsadobe.com/is/image/content/dam/business-unit/whirlpoolv2/en-us/marketing-content/site-assets/page-content/oc-articles/how-to-install-a-dishwasher/how_to_install_a_dishwasher_IMG10.jpg?fmt=png-alpha&qlt=85,0&resMode=sharp2&op_usm=1.75,0.3,2,0&scl=1&constrain=fit,1)
洗碗机安装常见问题
在开始安装洗碗机之前,了解一些常见安装问题的答案。
装一台洗碗机有多难?我需要多少工作经验?
建议有中等水平的管道和电力工作经验的人在没有专业帮助的情况下安装洗碗机。如果您以前从未安装过大型电器,或者您无法直接进入所需的安装位置,您可能需要考虑聘请专业人员。
安装一台洗碗机要花多少钱?
根据安装洗碗机需要做的事情,安装费用可能在200 - 500美元之间。如果你需要修改管道、电线或台面才能成功安装洗碗机,安装费用会增加,因为这些修改需要专业人员的协助。请记住,安装成本也可能根据您的位置而有所不同。
洗碗机需要什么设备?
新洗碗机安装时需要连接供水、排水管道和电源线。
洗碗机有供水管道吗?
大多数洗碗机都有供水管道,但这可能因品牌和型号而异。
能帮我安装洗碗机吗?
如果你不愿意自己安装洗碗机,惠而浦可以提供专业的送货和安装服务对于大多数主要的电器,可以在结账时安排。
商店的漩涡®洗碗机
惠而浦®洗碗机为你提供日常生活所需的清洁。惠而浦品牌的洗碗机是您家庭所需的厨房电器,它具有第三个洗碗机架等功能,可以减少盘子留下的数量,并具有1小时的清洗周期,可以快速完成碗盘。
了解更多关于惠而浦®洗碗机
![金色家庭心跳标志上方的图像与惠而浦博客页面显示在背景](https://kitchenaid-h.assetsadobe.com/is/image/content/dam/business-unit/whirlpool/en-us/marketing-content/blog-posts/home2.jpeg?fmt=png-alpha&qlt=85,0&resMode=sharp2&op_usm=1.75,0.3,2,0&scl=1&constrain=fit,1)
![](https://kitchenaid-h.assetsadobe.com/is/image/content/dam/business-unit/whirlpool/en-us/marketing-content/blog-posts/home2.jpeg?fmt=png-alpha&qlt=85,0&resMode=sharp2&op_usm=1.75,0.3,2,0&scl=1&constrain=fit,1)
家里的心跳
准备好了解更多小贴士、家庭小妙招和电器指南了吗?